- Author Matthew Elmers elmers@military-review.com.
- Public 2023-12-16 21:49.
- Last modified 2025-01-24 09:17.
In the discussion of articles on the Russo-Japanese War, an interesting discussion arose repeatedly about the maneuver called "crossing T", or "stick over T". As you know, the execution of this maneuver, which allows the entire squadron to concentrate the onboard fire on the lead or end ships of the enemy, was the highest tactical victory of the naval commander in a naval battle.
In other words, it was believed that with a somewhat comparable level of artillery preparation of the opposing squadrons, the "crossing T" guaranteed the victory of a naval battle.
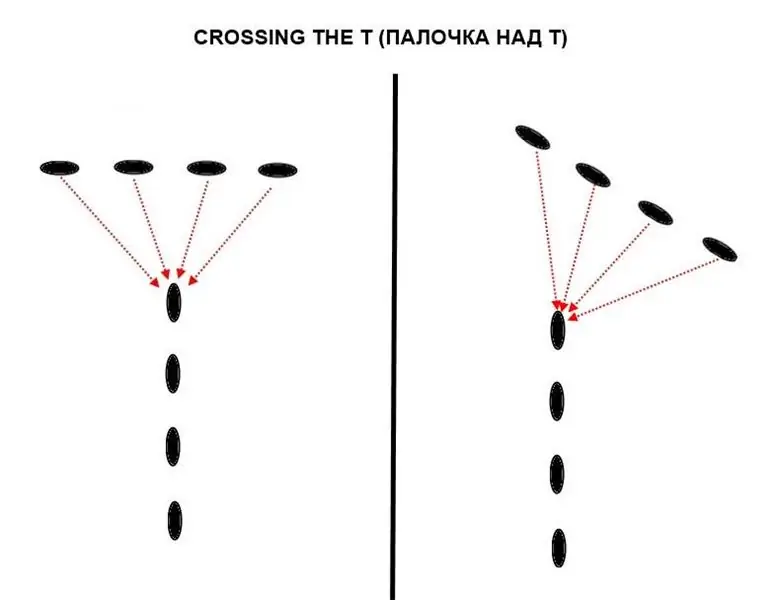
Of course, the admirals tried to exhibit "crossing T" to their "opponents" in peacetime, during training maneuvers. And here, in the author's opinion, the exercises of the British fleet conducted in 1901-1903 are very indicative. Three years in a row the squadrons of the Royal Navy converged in "battle", and all three times one of the squadrons had a slight superiority in speed - within 2 knots. At the same time, all three times the low-speed squadron lost with a bang, as it was exposed to "crossing T". One can, of course, assume that it was the commanders, but this is extremely doubtful. So, the admiral, who commanded the "high-speed" squadron in 1901, achieved victory for it, but in 1903, being put in charge of the "slow-moving", lost the maneuvers near the Azores.
From the above, of course, the conclusion suggests itself that a gain of about 2 knots gave a colossal tactical advantage to the squadron that possessed it. With some correct actions of the commander of the high-speed squadron, the slower one had no chance to avoid the "crossing T".
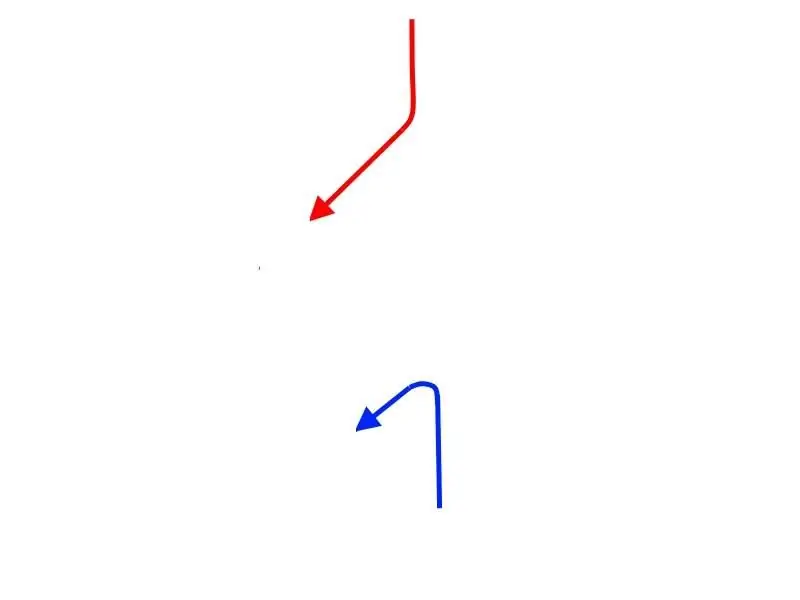
However, to many fans of military history, this thesis seemed erroneous, and here's why. The fact is that there is a certain position of the squadrons, in which the "two-node" gain in speed does not allow the faster squadron to set "crossing T". Suppose two fighting squadrons are fighting a "correct battle", that is, they are fighting in wake columns, heading in one direction. Naturally, the faster squadron will gradually overtake the enemy column and its commander will have a desire, turning across the enemy's course, to expose him "crossing T". Let's show this in a simple diagram.
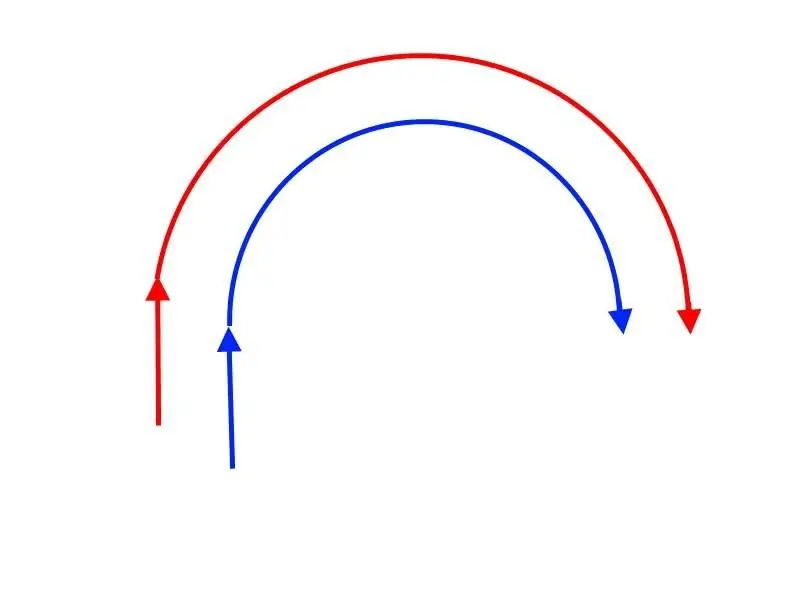
Let's say a high-speed squadron of "red" is fighting with a slow-speed squadron of "blue". The admiral of the "blue" sees that the "red" are turning in order to expose him to "crossing T". What can he oppose to his opponent? It's elementary - to repeat his own maneuver. In other words, when the “reds” go across the “blue”, the latter turn in the same direction. If the "reds", seeing that the enemy is turning away from them, again turn to him across the path, then it will be necessary to turn away from them again. In this case, the squadrons will move along two circles, one of which is inside the other. Moreover, the more high-speed "red" will have to walk along the outer circle, and the less high-speed "blue" - along the inner circle.
But from the school geometry course, we know that the circumference (perimeter) of the inner circle will be significantly less than the outer one. Accordingly, the speed advantage of the "red" squadron will be wasted on the fact that in the same period of time it will have to cover a greater distance than the "blue" - of course, in such conditions no "crossing T" will be possible.
And so, on the basis of this "maneuver of the inner circle," the assumption arose that in fact the speed advantage by 15-20% is completely negligible, and can easily be countered by the correct maneuvering of the slow-moving squadron.
So what is it - 2 nodes of the advantage of pre-dreadnought squadrons of the era of the Russo-Japanese War? The guarantee of victory, or a purely theoretical, but meaningless in practice advantage? Let's try to figure it out.
Initial data, or such complex simple maneuvers
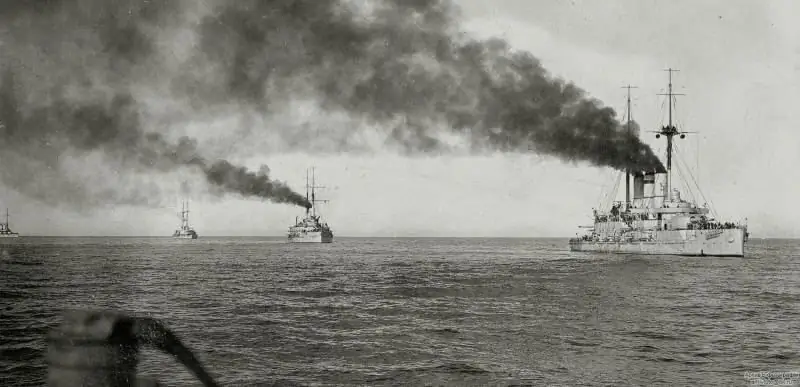
For any modeling, initial data is required, which we will now designate. The author will consider the possibilities of using "crossing T" on the example of maneuvering 2 squadrons, each of which is made up of 12 armored ships. Suppose also that all ships of both squadrons have the same length of 120 m each, and the intervals between them are standard, and are 2 cables (in one cable - 185.2 m). Consequently, the length of the column of each squadron from the stem of the flagship to the sternpost of the closing battleship will be about 30 cables. We will set the speed of the "red" squadron to 15 knots: the "blue" squadron will have 2 knots less, that is, 13 knots. And now let us take a short break, because there is one extremely important “but!” That should be specifically mentioned.
Any maneuver the squadron can start only after the completion of the previous one.
Why is that? Let us explain with the example of the simplest maneuver - the squadron turns sequentially by 8 points, or 90 degrees. It would seem, well, what's so complicated about that - the lead ship, having raised the appropriate signal, turns 90 degrees. Behind him, the other ships of the column repeat the maneuver … An elementary action, available not only to the commander of the ship, but to the midshipman of the 1st year! Well, maybe not for the midshipman, but the midshipman will definitely handle it, right?
Alas, absolutely not so.
There is such a concept as the diameter of the tactical circulation or the normal distance between the return course lines after the ship has turned the first 180 degrees.
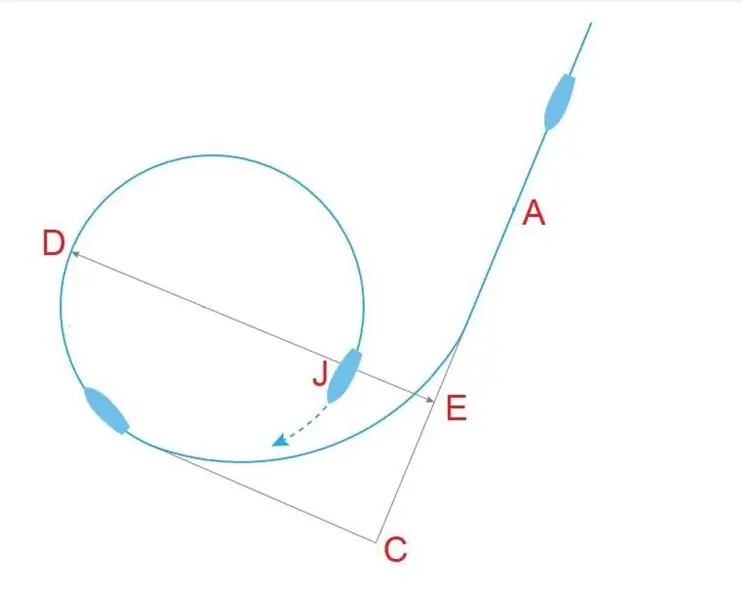
So, each ship of the squadron, following at the same speed, has its own circulation diameter, individual, and it depends on many things - this is the ratio of length to width, the area of the rudder, the angle of its transfer, the shape of the hull, as well as external factors, such as excitement, current and wind. In theory, for ships of the same type, the circulation diameter should be almost the same, but in practice this does not always happen. Unfortunately, this indicator is usually considered unimportant and is rarely cited in reference books, so there is not as much data as we would like.
It is known that the higher the ship's speed, the smaller the circulation diameter. For example, the American battleship Iowa 2, 712 cab. on the starboard side at 10-knot speed and 1, 923 cab. on the port side at a 14-knot speed. But the same type of French battleships of the type "Devastation" turned out the opposite: "Devastation" at 9.5 knots described a circle with a radius of 725 m, while "Courbet" at a speed of 8 knots. had only 600 m. It is clear that at a speed of 9, 5 knots. the circulation of Courbet would be even more significantly different from that of Devastación.
Or take, for example, the Japanese battleships Yashima and Fuji. The ships are considered to be of the same type, but at the same time they had differences in the underwater part. The fact is that these ships were built at different enterprises, and the designer Philip Watts, adapting the drawings to the capabilities of the Armstrong plant, cut off the deadwood from the future Yasima, also installing a balance rudder. As a result of these actions, Yashima received an extremely small circulation diameter for ships of its class, while Fuji was closer to the average of British battleships.
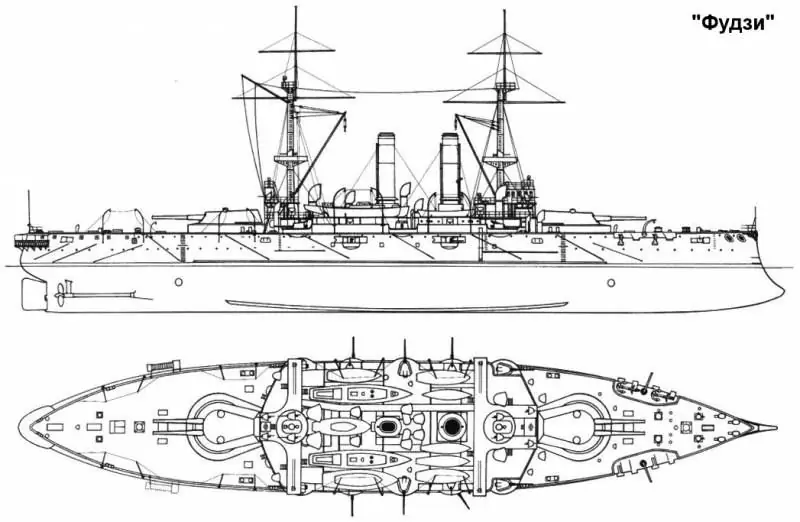
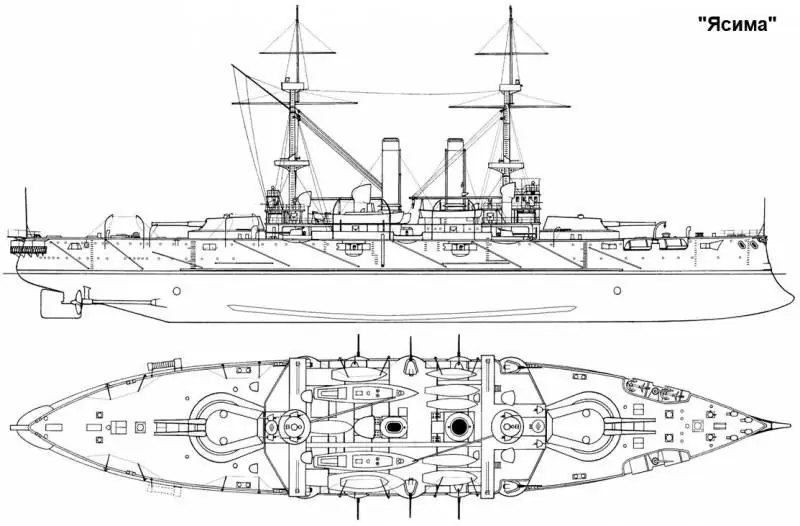
In addition to the hull design, the circulation, of course, was influenced by the speed of the rudder shift, which could be different from different drives - for example, on the battleship Slava, the rudder from the "straight" position could be put on board for 18 with a steam drive and 28 with electric. The windage of the above-water part was of great importance - for the same "Slava", the diameter of the circulation, depending on the wind strength (from 1 to 6 points), varied from 3.25 to 4.05 cables.
Perhaps it should be said that the diameters of the circulation of the battleships of that period averaged from 2 to 3, 8 cables, but in some cases they could be less or more. By the way - it's funny that the diameter of the circulation could differ even for one ship, depending on which side it turns to: for the armored cruiser Maine (1895) at a speed of 12 knots, it was 2.35 cab. on the starboard side and 2, 21 cab. to the left.
In addition to the difference in the diameter of the circulation, there is also a difference in speed: ships in circulation can lose, according to various sources, up to 30-35% of their speed, but, again, this depends on their individual characteristics.
And so, by virtue of all of the above, even the usual turn of the squadron by 90 degrees. becomes a kind of circus act. The ships go to the wake, but it is not so easy to grasp the point at which the flagship begins to turn, and you still need to make an allowance for the difference in the circulation diameter, which is not constant and varies for many reasons. It is not surprising, therefore, that when the ship going in the ranks completes the turn (that is, in our example, changes its course by 90 degrees), it will find that it is no longer going into the wake of the ahead matelote, but is to the right or to the left, while the prescribed interval between ships, of course, is broken. Accordingly, the ship needs time to align in the ranks - that is, to return to the wake and align the set interval. That is, even two ships will experience some difficulties with rebuilding, and the maneuver of an entire squadron may be complicated by what can be called a "deaf telephone". The fact is that the ship following the flagship makes a turn with an error due to its circulation diameter, etc., but the battleship following it cannot be guided by the “reference” course of the flagship, but follows the “wrong” trajectory after the second one. Thus, the error-deviation from the flagship course for ships at the end of the formation will gradually accumulate, and may increase significantly.
That is why the squadrons need joint maneuvering, the ships, their components, must be floated. The ability to maneuver in those days did not exist by itself, but in conjunction with specific ships. That is, the battleship, which perfectly knew how to keep the formation in one squadron, being transferred to another, at first it will constantly be knocked out of order. And not at all because his commander does not know how to maneuver, but because he needs time to get used to the peculiarities of maneuvering the ships of his new squadron, to adapt to their circulation diameters, etc. Digressing a little from the topic, we note that this was precisely the problem when the 3rd Pacific squadron was joined to the 2nd. Rear Admiral N. I. Nebogatov could train his crews as much as he wanted and hone maneuvering in his squadron to brilliance, but after the reunification of the squadrons, he still needed to sail with the ships of Z. P. Rozhdestvensky.
Anyone interested in the history of steam fleets knows the extremely important role that formation plays in battle. And you need to understand that any, even the simplest maneuver, in fact, destroyed the established formation of warships, so they needed some time to restore it. That is why it was extremely dangerous to start a new maneuver without completing the previous one - in this way it was possible to completely upset the squadron's battle formation. And that is why the admirals of those years began the next maneuver only after the completion of the previous one. Well, when they didn’t … Let me remind you that during the 1901 maneuvers, a relatively slow-moving British squadron under the command of Rear Admiral Noel, being attacked by a faster enemy, did not manage to reorganize into battle formation before the "Crossing T" …As follows from the Russian-language descriptions of this episode, Noel tried to somehow rectify the situation by ordering to increase the stroke. But the result of not even a new maneuver, but a simple increase in speed in conditions when the ships did not finish rebuilding, was that the formation of the British battleships simply collapsed. Let me remind you that we are talking about British ships, the sailors of which were traditionally strong in maneuvering.
For our example, for both squadrons, we take the size of the circulation diameter of 2.5 cables, the turn time for 90 degrees is 1 minute and for 180 degrees. - 2 minutes.
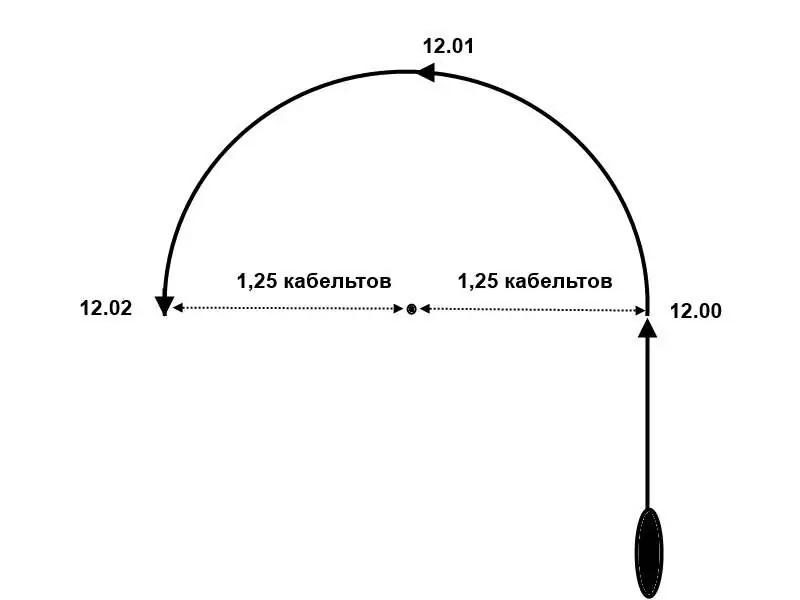
This will be a well-known simplification, since a slower squadron will have a larger circulation diameter and will execute it slower than a high-speed one. Let's make one more simplification - we will not accurately calculate the arc length and circulation time every time - in those cases when it is closer to 90 degrees, we will take the circulation time per minute, when it is closer to 180 degrees. - in 2 minutes. This is necessary in order not to complicate the calculations beyond measure.
And now - "crossing T"
As we said above, the "Inner Circle Maneuver" was guaranteed to save the slower squadron from "crossing T". However, the supporters of this maneuver overlook one extremely important nuance: in order for this maneuver to work, it is necessary to somehow "convince" the commander of the faster squadron to line up in a parallel "low-speed" squadron, and from this position try to put the "slow-moving" "Crossing T".
In other words, the "inner circle" can really help a slow-moving squadron, but only if the high-speed squadron, instead of, without further ado, immediately expose the "crossing T" to its slow-moving enemy, fight in wake columns, and only after that will try to set "crossing T". But why would a high-speed squadron do this?
There is absolutely no need. Thus, our tactical assignment for the sides boils down to the following: the main task of the slow-moving "blues" is to force their opponent to engage in "correct battle" in parallel columns. If they succeeded, we believe that the "blues" have achieved victory, because in this case the high-speed squadron will indeed lose the opportunity to deploy the "crossing T". Accordingly, the task of the high-speed "red" squadron will be to set the "crossing T" and avoid entering the "correct battle".
Of course, the faster squadron will have a definite advantage in taking the most advantageous position for itself. But she doesn't really need it, because in order to put the squadron of "blue" in a hopeless position, it is enough to make only one, fairly simple maneuver.
To do this, the "red" had enough to approach the enemy squadron by about 40 cables, and then turn so as to cut across the course of the "blue" at an angle of 45 degrees. left or right.
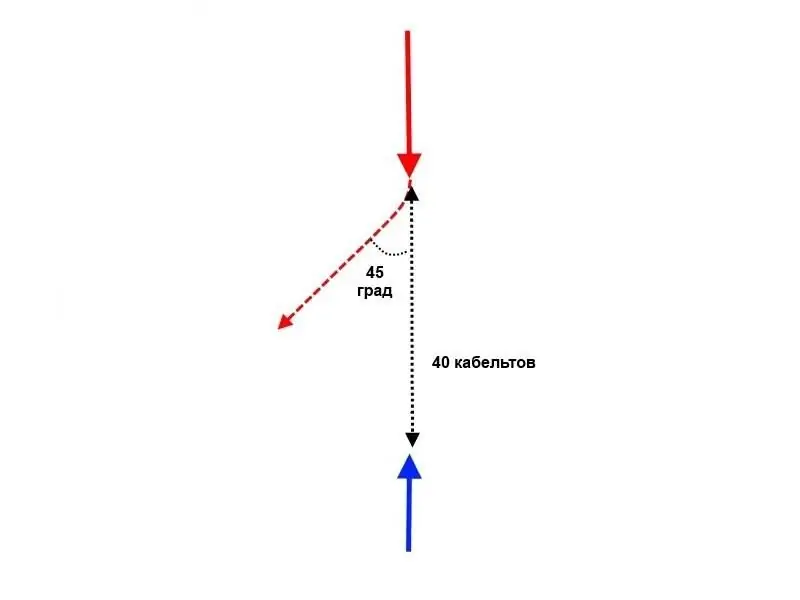
After that, the "blue", according to the author, will not have a single chance to avoid the "crossing T".
Why is that? Let's take a look at all of the Blue Admiral's options for action in response to such a Red Maneuver. In essence, all his possible maneuvers are reduced to making turns or turns sequentially, or "all of a sudden." Let us first analyze the options for turns sequentially.
Take, for example, a situation where the squadrons go on a collision course, and then the reds turn 4 rumba (45 degrees) to the left, as shown in the diagram above. "Blue", of course, are free to choose any direction from their available 360 degrees.
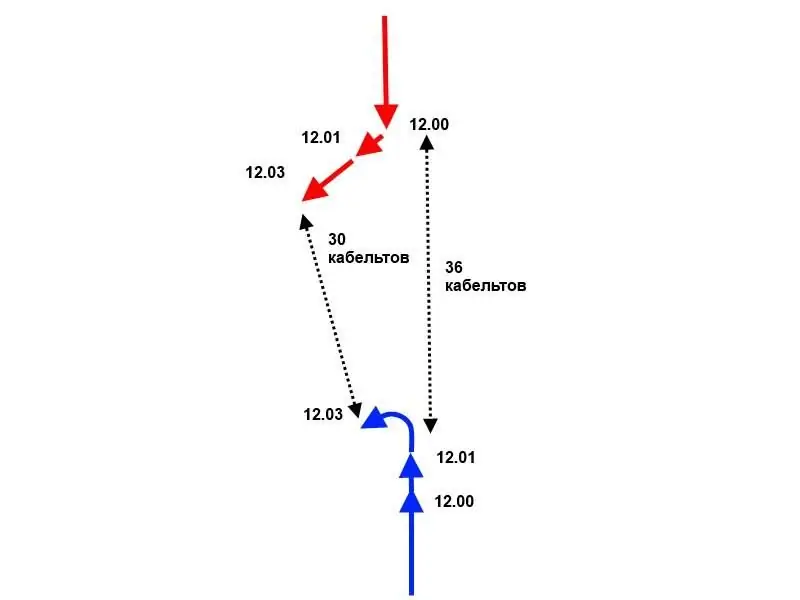
What happens if the BLU Admiral dares to go straight without changing course? Suppose (here and in all other variants) that the approach of the squadrons by 40 cables occurred at 12.00. Then the "reds" make a turn, which takes a minute of their time, so that at 12.01 their flagship goes on a new course. After about 9 and a half minutes, the blue squadron will receive the classic "Crossing T" - its flagship will come under dagger fire from a wake column of 9 "red" ships, at a range of 11 to 16, 5 cables. The flagship of the "red", at first glance, is also in danger, and this is actually so, but still 9 enemy ships closest to it can shoot at it from a distance of 16, 5 to 28, 5 cables, but still its position and not nearly as dangerous as the blue flagship. The position of the squadrons is shown in Fig. 1 of the following diagram.
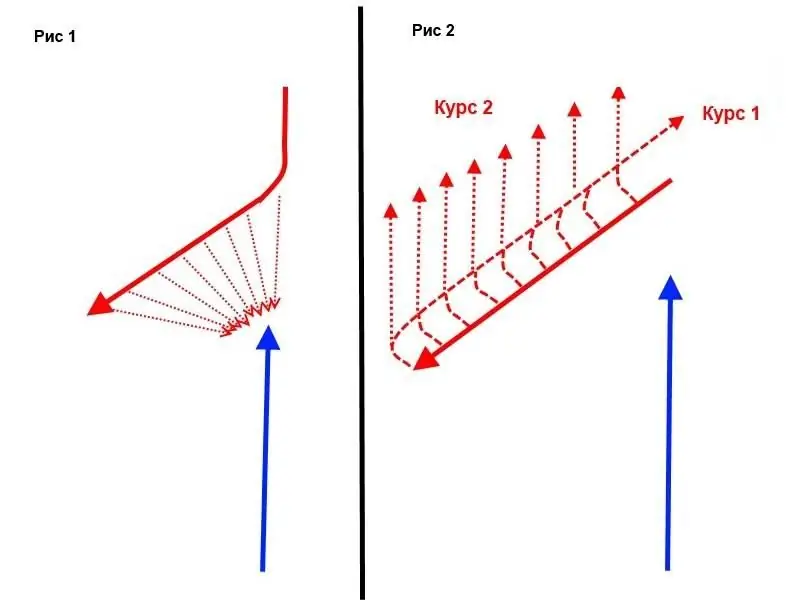
At the same time, the Reds will complete the turn at 12.13, and by this time the distance from the Reds' flagship to the nearest enemy ship will exceed 21 cables, while the Blue flagship will by this time be defeated at a distance of 5-10 cables.
What's next? It is safe to say that with such a maneuver of the "blue" the head of their column will be broken, and the "reds" can simply turn "all of a sudden" 180 degrees in order to continue their wand over T. But you can not do this, turning "all of a sudden" on a course parallel to the squadron of "blue", and smashing them, retreating in the ledge line - in this case, of course, "crossing T" will also take place.
So, it is pointless for the Blues to follow the previous course. But maybe it is worth trying to cut across the "red"?
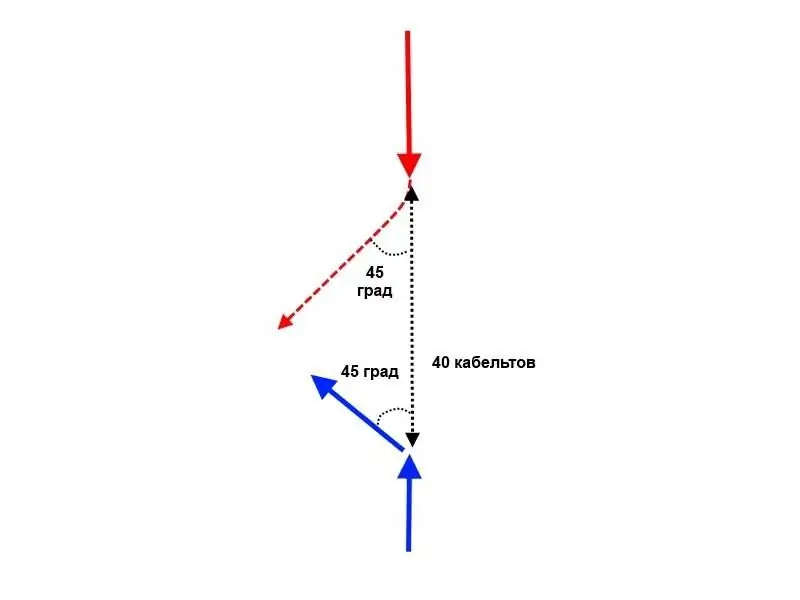
This will not help - here everything is decided by those same 2 knots of speed superiority. In this case, the problem turns out to be very simple, and really comes down to high school geometry. We have a right-angled isosceles triangle, in which the hypotenuse is the distance between the squadrons, and the legs are the courses of the squadrons after the turn. Following these courses, the squadrons will converge at an angle of 90 degrees. If the "blue" and "red" were turned at the same time, then all the same, the "red" would be ahead of the "blue" by about 1.5 minutes, that is, the flagship of the "red" would have crossed the course of the "blue" at about 3, 8 cables from him in front of the stem. This is too little to talk about "crossing T", there would be a dump, but the problem is that the "blues" will not be able to change course at the same time as the "reds".
The admiral of the "blue" seeing that the flagship of the "red" is turning somewhere, he will have to wait until he lies on a new course, to determine this new course, to make a decision on a counter-maneuver, to give the command for execution, but it still takes time to execute … More time will be lost on this - and these two summands in total will lead to a delay that will allow the "red" to deliver the "crossing T", cutting the course of the "blue" by about 8-10 cables. And again - if the "blue" and "red" had the same speed, then this number would not have passed. Yes, the “reds”, taking advantage of the fact that the “blues” started the maneuver later, would have overtaken the latter, but not by much, and instead of “crossing the T” it would be a dump. But the combination of two factors - the lower speed of the "blue" and the fact that they are the second to start the maneuver - leads to the fact that they will be exposed to "crossing T".
But why in our tactical task the Reds always maneuver first? The answer is very simple - "blues" cannot afford this. Walking at 13 knots, it will take them almost 14 minutes to complete the maneuver, while the Reds only take 12. Thus, the admiral of the Reds will always have time to consider the Blue's maneuver and carry out his own counter-maneuver, with both squadrons finishing their maneuvers. almost simultaneously. That is, a faster squadron, if you give it the right of the second move, will get just an enchanting advantage.
For example, if the "blues" are the first to try to go 45 degrees. from the course of the "red" squadron, then the red ones will immediately "cut" its course, and their speed is just enough to set the classic "crossing T"
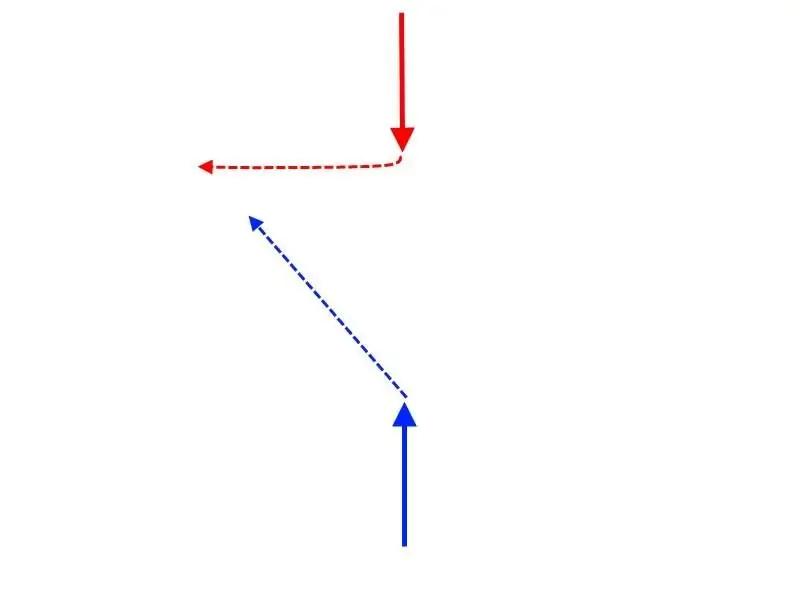
And the "blue" will not be able to do anything, because by the time they complete the turn, "crossing T" will have already been set.
Well, okay, you can't go across the "red" line, but then what else can you do? Maybe try to lie on a course parallel to the Reds in order to go in one direction with them, or diverge in a counter-course? Well, let's take a minute to look at the situation in which the Blues turn around and fall on a parallel course.
So, at 12.00, the distance between the opponents is 40 cables and the "reds" start turning. At 12.01, their flagship lays down on a new course, having shifted as a result of circulation by about 1.25 cables from the point of the beginning of the turn, and the squadron of blue, following the same course, passed almost 2.17 cables. Suppose the Blues have a fantastic reaction and begin the reversal immediately after the Red flagship has completed the reversal, although this is, of course, unrealistic. But let's say.
At this moment (12.01) the distance between the turning points of the squadrons is just over 36 cables. In the next 2 minutes, the "reds" continue to carry out the maneuver, that is, their flagship, having described a semicircle, returns to the traverse of the point from which it started the turn, but is now 2 cables closer to the "red" (or further, if it makes a turn to the right) … Thus, the Blues start moving on the new course with at least a two-minute delay relative to the Reds. Since “red” takes 12 minutes to complete the maneuver from the moment their flagship enters a new course, and “blue” - almost 14, then at 12.13 the “red” finish the maneuver, and the “blue” still has almost 4 minutes. It turns out that the "red" can start any maneuver, while the "blue" will be able to start reacting only after 4 minutes, when they complete the changeover.
It should be noted that during the entire maneuver of the Blue, the Reds have a fire advantage. Assuming that the battleship will start firing after it sets on a new course, at 12.03 on the flagship battleship "blue" 3 lead ships will be able to "work", and only the flagship of the "blue" will answer them. In the future, of course, the rest of the ships will turn after him and engage in battle, but by the time the deployment is complete, the "red" ships will have 12 ships to fire, and the "blue" - only 8. That is, of course, at this stage, no " crossing T "is not yet, but the beginning of the maneuver is unsuccessful for the" blue ".
And then the "reds" can turn sequentially to the left (Fig. 1 in the diagram below) in order to expose the "crossing T" to the end ships of the column.
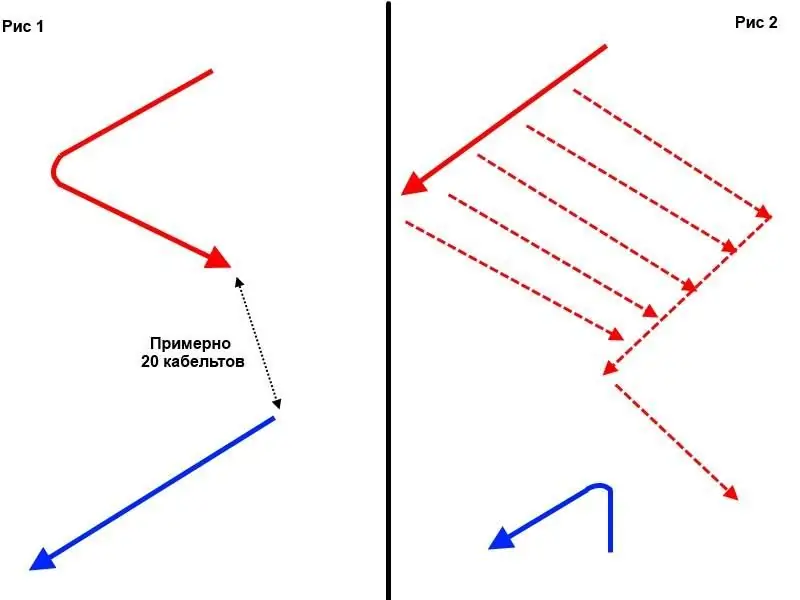
But then they themselves will find themselves in an unpleasant situation for some time, since their ships that have turned will interfere with the fight for the rest. It would be wiser to act a little more cunningly, making a turn "all of a sudden", as shown in Fig. 2. By the time the "blue" finally rebuild, the distance between the nearest ships will not exceed 20 cables, and soon the squadron of "red" sharp heading angles "blue", so that the effectiveness of artillery fire will weaken on both sides. And after that "cut the tail" of the column of "blue" (Fig. 2)
In this case, "blue" in any case, there will be nothing left but to leave, trying to break the distance with the red and hoping for a miracle. Theoretically, they could try to turn around “all of a sudden”, but in this position this maneuver does nothing for the “blue”.
Thus, we see that an attempt to lie on a parallel course and move in the same direction with the “red” does not save the “blue” from defeat. Well, what happens if the Blues, in the outset of the battle, try to take a countercourse? Yes, everything is the same, the situation is almost mirrored. At first, the “reds” and “blues” will indeed disperse on the counter courses, but the “reds” will finish the rebuilding faster. As a result, they in the same way, turning "all of a sudden", will be able to first approach the end ships of the "blue", and then expose them to "crossing T".
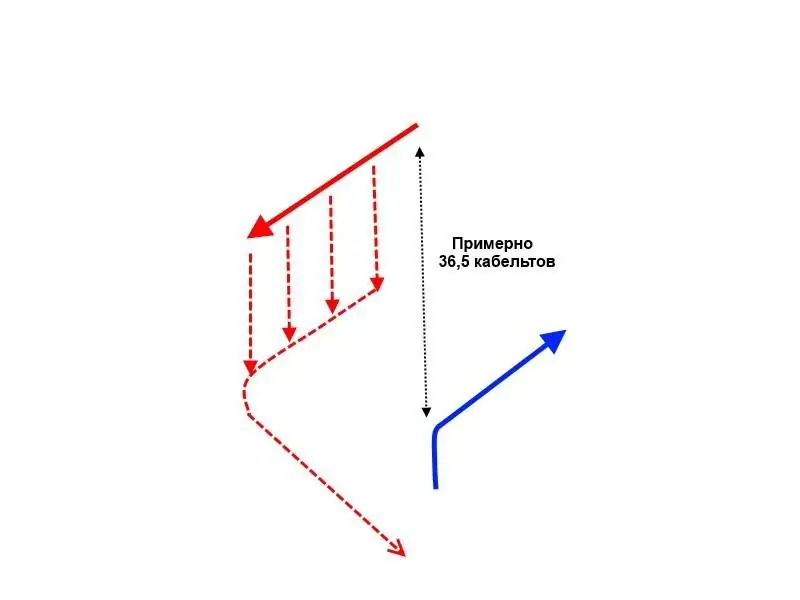
What options are still possible for the Blues? Run away from the "red" squadron? But such an evasion maneuver, whether it be performed at least by turning sequentially, at least all of a sudden, still leads to the fact that at the end of the column of "blue" there will be a squadron of "red" lined up in a ledge formation, which means that "crossing T" is inevitable.
But maybe the “blue” should try to “play” on the same properties of the triangle, which in all the above examples play into the hands of the “red”? If, in response to the turn of the “red” by 45 degrees, and turn in the same direction, but not by 45 degrees, but by all 90? In this case, the admiral of the "blue" will lead the squadron entrusted to him, as it were, along the leg of a right-angled triangle, while the "reds" will follow his hypotenuse. In this case, the "red" will have to go much longer than the "blue" and their superiority in speed will be neutralized.
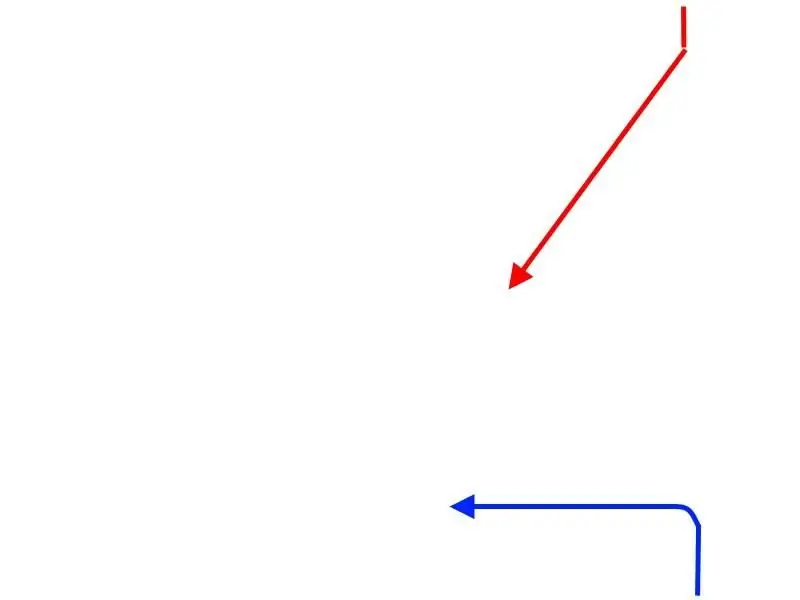
All this is true, but the commander of the "Reds" has quite an elegant counter-maneuver.
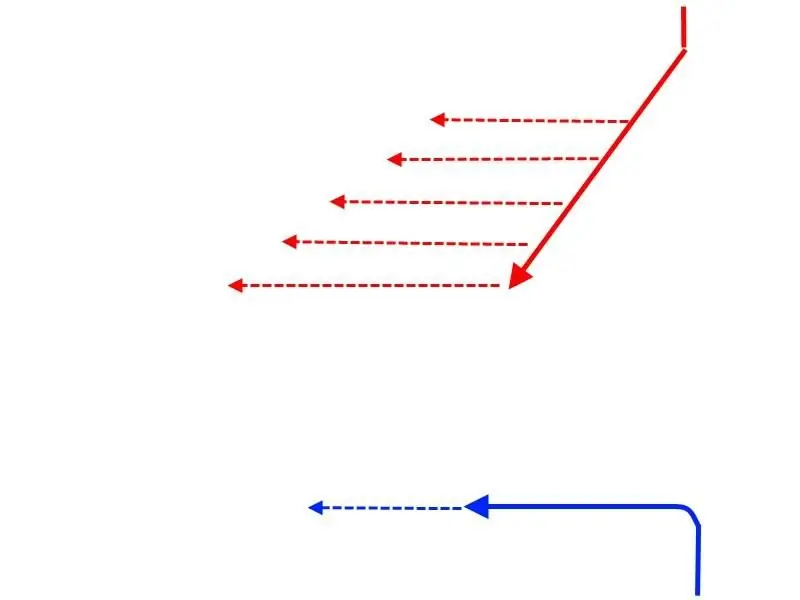
The turn "all of a sudden" and movement along the course of the "blue" will bring the formation of the ledge of the "red" to the head of their column, and Carthage will be … ehhkm, "crossing T" will be delivered.
All other reversals (they can still go to any degree out of 360) are a special case of one of the above maneuvers.
conclusions
So, we have considered all the basic maneuvers of the "blue", but in no case will they be successful. The 2-knot advantage seems small in the era of the pre-shima armored fleets, but it really did provide those with a decisive advantage for two main reasons.
First, it gave the "first move" right, that is, it transferred the initiative to the high-speed squadron. At a distance of about 40-45 cables, it would be extremely dangerous for a low-speed squadron to initiate a maneuver first, since its high-speed enemy had the opportunity to immediately “punish” such an initiative by setting up “crossing T” or at least taking a position to set it up.
The second reason followed from the first - since the slow-moving squadron could only respond to the actions of its high-speed "opponent", it ended its counter-maneuver much later than the enemy. The lag consisted of the loss of time to assess the enemy's maneuver and more time to perform the maneuver than was required by the faster squadron. Thus, no matter what counter-maneuver the slow-moving squadron started, it completed it much later than the high-speed one, which, again, gave the commander of the latter an indisputable advantage.
Two "Why?" and one observation
In conclusion of this article, I would like to note a couple of nuances. The schemes of maneuvers presented by the author, which must be performed "in red" in order to perform "crossing T", are rather complicated. We are talking about turns "all of a sudden", after the execution of which the flagship is at the end of the formation, and the end ship must lead the squadron, making further turns "all of a sudden" or turns in succession. According to the author's deep conviction, in real life such complicated maneuvers were not required to set the "crossing T". The need for them in our example is solely due to the preferential assumptions for the "blues" in the accepted rules of our tactical game. As a matter of fact, all the descriptions given are not a "textbook for an admiral", but rather a justification that the setting of "crossing T" by a squadron with a speed advantage of 2 knots is geometrically possible.
Why, in the battle at Shantung H. Togo, having an advantage of even more than 2 knots, did not put up "crossing T"?
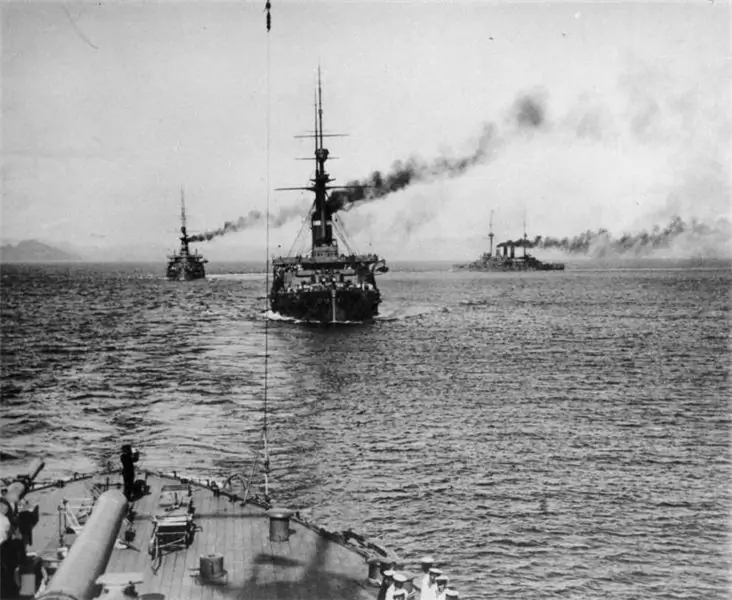
The answer is very simple - the Japanese admiral was overly cautious. Still, in order to set the "crossing T", it was required to vigorously approach the enemy and maneuver at a relatively small distance from him, and H. Togo did not dare to do this in the first phase of the battle.
And, finally, why, in the interval between the world wars, the British came to the conclusion that a 10% speed superiority does not give the squadron that possesses any tactical advantages, which was the reason for the decrease in the speed of the King George V-class battleships? The answer is very simple - with the advent of the dreadnought era, the distances of the artillery battle increased significantly, and the approach of 40-50 cables with subsequent dashing maneuvers became impossible. Well, when maneuvering 70 cables and more, the 10% speed increase really did not give any advantage.


